
![]() Sometimes DIY projects can get pretty overwhelming for people who aren’t gifted in the craft/art department, but Laurie always comes through every week with something unique and easy to handle even for novices like me. This DIY leaf boutonniere is great little project to get your feet wet with even if you’ve been hesitant to tackle any projects on your own.
Sometimes DIY projects can get pretty overwhelming for people who aren’t gifted in the craft/art department, but Laurie always comes through every week with something unique and easy to handle even for novices like me. This DIY leaf boutonniere is great little project to get your feet wet with even if you’ve been hesitant to tackle any projects on your own.

Directions
1. Begin by collecting two leaves for each boutonniere. Wipe them off with a damp cloth and let them dry.
2. Slide your leaf into the punch, and punch out your letter. (If you turn the punch upside down, it’s easier to see where to position it) (see figure 1)
3. After punching out your letter carefully slide it out of the punch.
4. Cut 2 lengths of floral wire approximately 6 inches long.
5. Hold your leaf, face down and run your wire horizontally through the back, towards the bottom of the leaf. (see figure 2)
6. Fold the wire ends down. Be careful not to tear your leaf when you fold the wire. (see figure 3)
7. At the stem of the leaf begin wrapping with your floral tape. Spin the leaf and wire in your fingers, wrap and pull the tape tightly as you work your way down. The tape gets sticky as you pull. When you reach the end of the wires, tear the tape and smooth down the end. If your tape job is a little lumpy, wrap another layer over it to tidy it up. (see figure 4)
8. Take one leaf, slightly smaller than your monogrammed leaf, and wire and tape just like you did with the first leaf in steps 5 – 7. (see figure 5)
9. Place the two leaves side by side, with the smaller leaf on the left. Wrap a layer floral tape around the two stems. (see figure 6)
10. Trim the wire ends so they are about 1.5 inches long. (see figure 6)
11. Cut a length of ribbon 12-15 inches long.
12. Place a ribbon tail approximately 4 inches long at the base of the two leaves. (see figure 7)
13. Run the ribbon down to the end of the taped wires and begin wrapping the ribbon upwards around the taped section. (see figure 8)
14. When you get to the base of the leaves, tie a knot with both ribbon tails to secure, then tie a small bow to finish it off. (see figure 9 and 10)
15. Trim your ribbon ends at an angle.
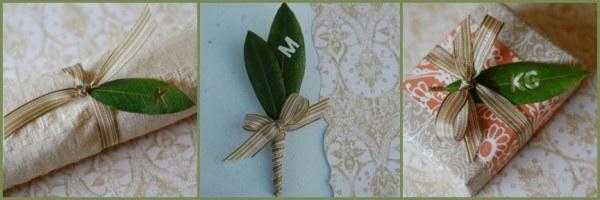
Like most boutonnieres, these are best made the day before, or morning of your wedding. To keep them fresh, place them in a Tupperware container under a layer of damp paper towels. Seal the lid, and place in the refrigerator.
You can also use the monogrammed leaves to embellish napkins, or trim your favor boxes. Just attach them using ribbon. You can use your own monogram, or your personalize them with your guests’ initials.