After a 3 month hiatus, I am so excited to announce DIY wedding projects are back on Once Wed. We’ll be welcoming back some previous contributors, but also welcoming some new columnists like Amy Moss. Amy writes the fabulous blog Eat Drink Chic and I’m thrilled to have her as part of our team…
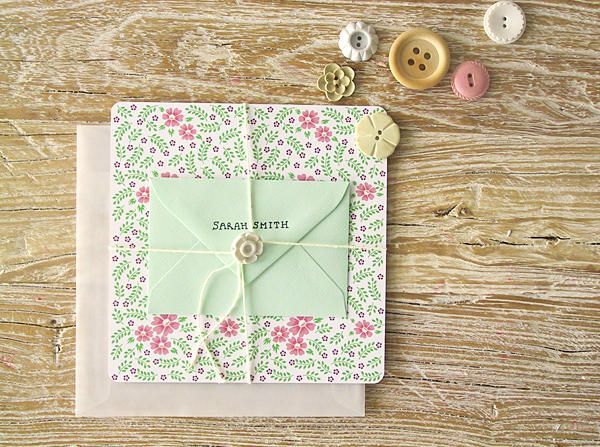
I love putting together pretty little packages, especially when they combine details such as vintage buttons, white string, floral prints, lovely paper and some unique handmade elements. This concept for Bridesmaid Thank-you Cards combines these very things and includes a very special handmade feature- a hand-printed notecard made with your own hand-carved heart stamps personalized with the first initial of each bridesmaid. Inside these notecards is room to construct your own private little thank-you message to each of your bridesmaids- something that they can keep as a memento for years to come.
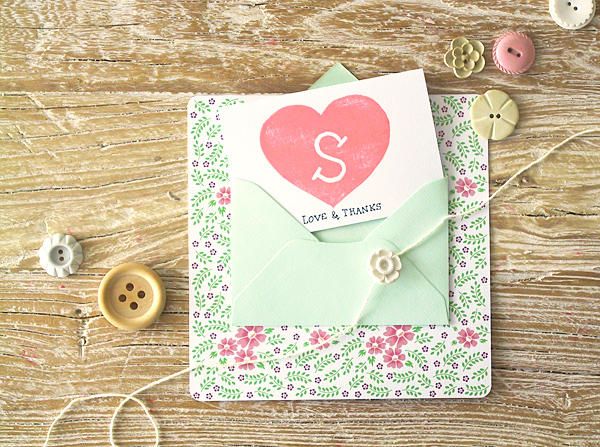
Although, at first, hand-carving and hand-printing is not necessarily a cheap exercise, once you have all the tools and have spent some time developing the required skills you have the potential to apply these across all of your wedding stationery. You can then let your imagination conjure up your own unique and beautiful details for your special day. Click the “more” link below to read more about this lovely project…
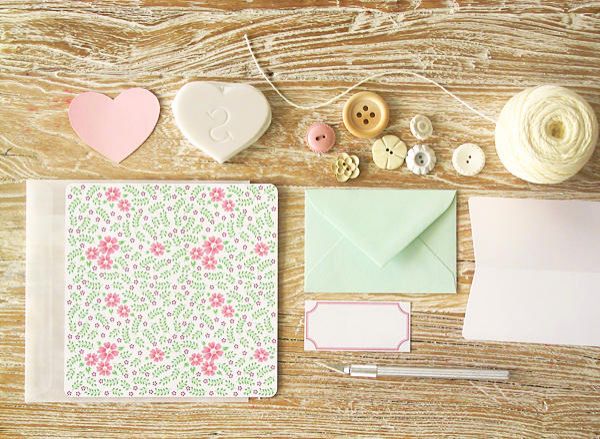
| GETTING STARTEDAs you can see, apart from your handmade notecard, this package is comprised of a lot of bits and pieces that you will need to source and gather together. A mini envelope, containing your thank-you notecard, is taped to the center of a piece of floral print backing card which is then tied up with string adorned with a beautiful vintage button then slipped into a translucent envelope with a label for your recipients details.
Like I said, there are lot of bits and pieces! Feel free to pick and choose what elements work for you and customise with your own colours/patterns. What you will need: 1. Scalpel, ruler and cutting board 2. Double-sided tape 3. Collection of vintage buttons 4. Mini envelopes 5. Large translucent envelopes 6. Thick, white textured stock 7. A large, patterned backing card* 8. Digital colour printer (optional**) 9. Label sticker 10. White string 11. Rounded corner punch 12. Superfine black pen 13. Ceramic/glass plate 14. A4 sheets of used paper 15. Pair of scissors 16. Grey lead pencil 17. Template for heart shape. Heart_Template. 18. Some special carving and printing tools and materials (separate list below) To begin you need to gather all the elements and make sure you have the appropriately sized bits of paper. I started with sourcing a large square translucent envelope. Depending on the size and shape of your envelope you will have to work out the measurements to create a backing card to fit perfectly inside. *For my backing card I’ve used a floral design (based on a vintage pattern) which you can Floral_Pattern_Backing_Card and print onto thick white textured card using a colour printer. I’ve then used my scalpel, ruler and cutting board to cut it to the right size. If the design I’ve provided is not what you’re after you can find your own pattern to print. **Alternatively if you don’t have a colour printer you can source some patterned card from your local specialty paper shop. In the center of this backing card I’ve stuck down a mini green envelope with double-sided tape. I’ve then cut up some more textured white paper to create the folded thank-you notecard to sit inside this envelope. The front of my notecard measures 10cm wide x 7cm tall to accomodate both the heart (based on the template which is 6.5cm wide x 6cm tall)and some text below. If you are also using my heart template you will need to make sure you card is of similar measurements and that the mini envelope is slightly larger than this. Finally, I’ve applied a rounded corner punch to round all the corners of both the large backing card and the folded notecard.
|
| CARVING AND PRINTING TOOLSAND MATERIALSMost of these should be available in arts/craft stores.
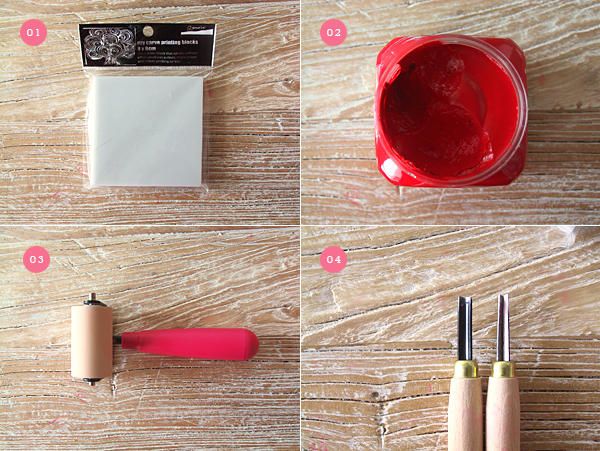
1. Printers blocks. I’ve used an Ezy Carve 8x8cm block in this tutorial. (It cuts like butter! Gone are the painstaking days of lino-cutting that I did back in high school art class over 10 years ago!) However, If you are carving multiple stamps, one for each of your bridesmaids, it’s a lot more cost-effective to buy a larger sized carving block (you can get them in A5 sheets as well) and cut it up into the separate stamps. 2. Block inks. I’ve bought white and red pots of ink so that I can mix the right shade of pink. 3. Hard roller 4. A set of carving tools. I bought a set of 4 carving tools but only really ended up using the two shown in the pic. A larger, wide tool with a rounded valley and a thinner tool that has a v shaped valley. Apart from the four important tools above, for carving and printing you will also need to use the plate and A4 sheets of paper (try recycling some already used sheets) to help with mixing inks, the grey lead pencil and the pair of scissors that were all mentioned in the first list of items. To help with carving your heart you may wish to use this template I’ve created (as mentioned also in the first list) or if you’re confident enough, you can draw it yourself freehand. GENERAL TIPS Be careful with your printers blocks. Keep them protected when not in use. You don’t want to get accidental nicks and cuts on the surface. Obviously this can be quite a messy job so make sure you have some newspaper or scrap paper sheets to cover your workspace when printing. With you printings blocks, buy more than you need. You may need to practice a bit to get the hang of carving. Be patient and expect to make a few mistakes at first. Don’t forget the areas that you cut away are the areas that will NOT be printed. Any letters or numbers that you carve need to be written BACKWARDS. Any design you create will print in reverse.
|
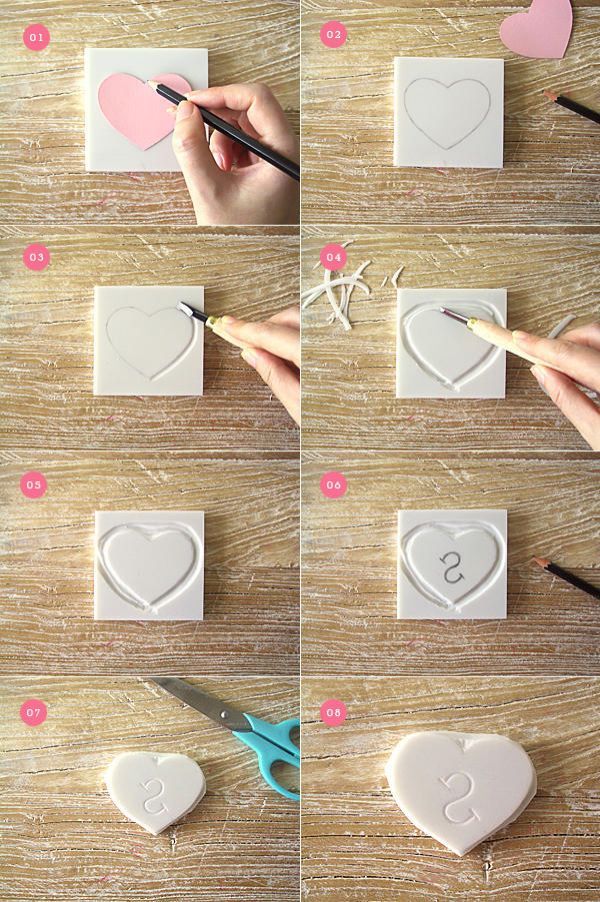
| HOW TO HAND-CARVE YOUR RUBBER STAMP1. Print out the heart shape template, cut out and place onto your printers block.
2. Use a pencil to draw the outline of the heart onto the block. 3. Take your larger, wide carving tool to start carving from the bottom of your heart shape. 4. Use your finer, thinner tool for the more difficult areas such as the indentation at the top of the heart. 5. Make sure the areas around your entire heart have been carved out sufficiently. 6. Draw the first inital of one of your bridesmaids BACKWARDS in the midle of the heart. Keep in mind that the larger the letter, the easier it will be to carve. Use your thinner, smaller carving tool for this. It is always best to do it in as few strokes as possible. For example, in carving the letter ‘S’ for this tutorial, I’ve made sure to do it in one smooth, steady carve for the whole body of the letter, turning the block with each curve. You want to try to maintain a consistent width throughout the whole letter. This may take a bit of practice. Keep in mind that it’s not ever going to perfect and nor should it be. 7. Use a scissors to trim the extraneous edges from the heart- it saves you from carving the whole block. 8. You now have your very own rubber stamp! |

| HOW TO PRINT1. Spread your block ink onto a plate. In my case I’ve used both red and white inks and mixed these together to create the desired shade of pink. To mix the inks I’ve simply used my hard roller to roll back and forth until the colours are mixed together.
2. At this stage there is a lot of ink on my roller and it’s very lumpy. In order to print you will need to have a very THIN and EVEN layer of ink on your roller. To achieve this I’ve used some A4 scrap paper sheets to roll out the ink until it becomes thin and even. 3. Gently roll onto the surface of your stamp until ink is thinly and evenly distributed across the entire heart. You don’t want any ink lumps and you want to make sure you’ve covered every part of the design that will be stamped. 4. Wash your roller, removing all the ink from it and then dry it. Get your folded notecard paper ready for printing. 5. Carefully place your stamp face down on the correct position on the front of your card. I’ve made sure to leave a bit of room at the bottom of the card so that I can write a little message below. 6. At this stage you want to make sure that the stamp does not move from its position, so keep it firmly in place with one hand and use your other hand to roll hard across the back which will help transfer the ink from the stamp onto your card. 7. Once you feel that you have rolled over the entire back of the stamp several times, very carefully remove the stamp from the paper. If the printed image has blurry or bleeding edges, this could either mean that your stamp accidently moved while being printed or you had too much ink on the stamp to begin with. If there are spots missing on your print it simply means that you probably didn’t roll hard enough over that particular area or there was not enough ink on your stamp. Personally, I don’t mind a few imperfections. 8. Once you’ve successfully created a print that you’re happy with, you can use a superfine black pen to write a message of your choice underneath. I’ve simply written “Love and Thanks”. NOTE: Once you have your inks and hard roller, you can apply this printing method in combination with any of your store bought stamps (that don’t have a handle) to create a much better print than you would by the traditional ‘stamp pad’ method. |

| THE FINISHING DETAILSOnce the card has dried, tuck it into the mini envelope and use your black pen to write the name of the recipient on the lid. Tie the whole thing in white string with a vintage button on top and slip the entire card into a translucent envelope adorned with a label that reads “to a beautiful bridesmaid…”.
Your thank-you card is now ready to be personally hand delivered to one of your bridesmaids! It would also be extra special to deliver it with a beautiful bunch of flowers! Project created by Amy Moss of Eat Drink Chic |
