The cold weather and impending holiday season has us yearning for warmer days and fields full of wildflowers and gardens ripe with vegetables and berries. We’re so happy to have Robyn of Bare Root Flora show us how to take clippings from your garden to create the perfect summer centerpiece. You could easily do this with fall foliage and fall flowers like peonies and maybe even amaryllis to give it a holiday flair. Keep reading for the full tutorial!  From Robyn of Bare Root Flora:
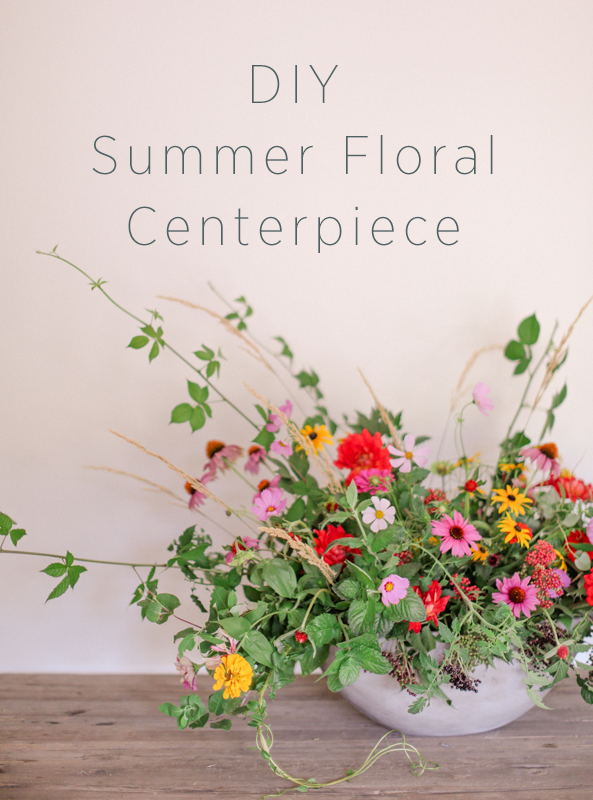
Late summer offers such a wealth of gorgeous flowers and foliage. I really wanted to celebrate the abundance of the season with a huge, wild piece that would be perfect for a focal piece at a summer gathering. Nearly all of the flowers in this piece were foraged in my own yard and the beautiful yard of a good friend. The few that weren’t were locally grown. Foraging for beautiful blooms makes you appreciate each stem so much—each one is a treasure, as was the sweet lady bug that hitched a ride into the arrangement! This design can be made on a large scale, like the one here, or scaled down to be a pretty table centerpiece.
Materials:
-Your favorite opaque vessel—I used a beautiful concrete vessel to ground the arrangement and give it an earthy texture.
-A piece of chicken wire large enough to create a reasonably tight fit in your container
-Several types of flowers and foliages you’ve gathered or bought. Try to vary the shape a bit so that some are soft and fluffy, some have a longer line, some are larger, some are smaller, some are viney in nature. Variety makes the arrangement dynamic! We used coneflower, rudbeckia (black-eyed Susans), dahlia, cottage yarrow, gomphrena, cosmos, zinnia, elderberry, mint, tomato, raspberry foliage, and reed grass, but use what your garden offers up to you!
-A floral knife or some clippers—no scissors! Scissors damage a flower’s stem, prohibiting it from drinking properly.
Instructions:
Step 1: The first step to any gorgeous floral arrangement is to prepare your flowers! Make sure you clean off any foliage that will fall below the water line. Leaves in the water will encourage the growth of bacteria, which will shorten the life of your arrangement.
Step 2: Next, prepare your container. Bend your chicken wire to fit snugly inside the container. The chicken wire acts as a grid to hold your flowers where you want them, giving your design the shape you want.
Step 3: Begin by greening your container with the foliage you’ve gathered. I used long-line
raspberry foliage to give my piece a dramatic shape. I filled in with gorgeous elderberry, tomato foliage, and mint. That gave me a good base to start flowering the arrangement.
Step 4: First, place some of your large, fluffy flowers in varying heights throughout the arrangement—here, big red dahlia for a pretty focal flower. I placed some low, near the lip of the container, and some higher, as if they were growing naturally. Next, start adding in your other flowers, being sure to vary the height of your placements, along with the colors of flowers—I used coneflower, zinnia, rudbeckia and sweet cosmos. The goal here is to create a wild, garden-grown look. Movement and flow are key—let the flowers reach and arc! It will give your piece so much depth and life!
Step 5: Be sure to design your piece from all the angles it will be seen. Turn your vessel as you design, continuing to place your larger, fluffier flowers a little lower, letting others reach toward the sky. Fill in with more foliages and pretty filler—we used lovely cottage yarrow.
Step 6: We finished our arrangement with sprigs of reed grass and little tufts of gomphrena for a wild look.
Florals and Tutorial: Robyn Rissman of Bare Root Flora | Photography: Laura Murray


